Your Name
aaafbc2d1e
save before hardlink
Your Name
aaafbc2d1e
save before hardlink
|
1 рік тому | |
|---|---|---|
| images | 1 рік тому | |
| web | 1 рік тому | |
| .gitignore | 1 рік тому | |
| .gitmodules | 1 рік тому | |
| README.md | 1 рік тому | |
| inception.md | 1 рік тому | |
| rclone.conf | 1 рік тому |
README.md
+++ date = '2025-04-13T13:14:28-07:00' draft = True title = 'Kyleguy Inception' +++
kyleguy
There are a few things that need to be setup to have a website. One needs a domain. This is just a name that people use to identify something. Google owns many domains, for example: www.google.com, google.com, gmail.com. These domains have various meanings to different people, but to you google.com probably means a website where one can find other websites, products, services, etc on the Internet. We need a domain. We need a place for our website to exist, we are going to host our website at pebbleguy.com. We also need a way to edit our site. These three things are really all that we need, each might abstract some difficulties, but nothing is too complex. For example to have a domain we need to manage the Domain Name System, it is easy albeit esoteric.
prerequisites - a thing that is the same as something that is required
This guide was primarily written for a single person and looks complex with a a bunch of tools and screenshots and clicks and stuff, but the overall process can be accomplished under a variety of environments. A couple tools that have binaries pre-compiled for Windows are needed because by default Windows does not provide any aid. Thankfully there are many Windows users that have stepped in and are helpping provide the necessary solutions. To give a brief overview of what is described in this guide here is a Debian version of this guide:
: "you need to add a DNS record for the domain kyleguy.rome7.com on your domain registrar"
# --
# Debian version of static site using Hugo
sudo apt install hugo;
# setup NginX configs for our webserver
git clone https://git.pebbleguy.com/Dan/pebbleguy.com
cd pebbleguy.com/scripts
./certbot-wrapper.sh -h kyleguy.rome7.com -u kyle
# Create the site
cd /mnt/external/projects
mkdir kyleguy && cd kyleguy && git init && touch README.md
hugo new site web
cd web
git submodule add https://github.com/theNewDynamic/gohugo-theme-ananke.git themes/ananke
echo "theme = 'ananke'" >> hugo.toml
sudo ln -s /mnt/external/projects/kyleguy/web/public/ /mnt/external/websites/kyleguy.rome7.com
# Commit the website and push the repository to git.pebbleguy.com
git add --all && git commit -m'added a static site with hugo'
git remote add origin http://git.pebbleguy.com/kyle/kyleguy.git
git push -u origin master
What we can see is that the user made sure that they had a DNS record for kyleguy.rome7.com then installed hugo. They pulled a copy of the pebbleguy.com repository so that they could execute the certbot-wrapper.sh to setup a webserver with a certificate signed by a certificate authority. They then setup a webroot and added a theme to their static site. Lastly they committed their site contained in a new git repository to git.pebbleguy.com. This is basically what we are going to do in this guide but we need some extra things. We are going to assume that the Windows user already has git setup and they know how to use it. They are going to need to connect to a remote server because Windows lacks several basic API calls needed for a reliable server. Idk is reliable is the right word. They lack the epoll API and do not support select or poll and would rely on a third party tools. That is what I actually mean by 'reliable'. I was saying they need to connect to a remote server which means one needs to be careful and run some commands on the Windows host and some using SecureShell on a remote host. In addition files need to be synced between the local and remote side which means we need a few more tools and configs. The installation of Hugo is the tiniest bit more complex, due to the differences between Windows Powershell the end-of-the-road 'powershell' that is installed on Windows, and Powershell the actively developed but not installed on any version of Windows. The guide tries to be a little on the verbose side, both becuase I lack clarity, also because this is just a guide hopefully details are useful, but when you fall off a cliff the guide can't catch you, it's just going to watch your inevitible tumble down the mountainside.
This is supposed to be pre-requisites. If you follow this first some you may be save yourself from difficulties later. To follow this guide we adhere to not storing easily exploitable private keys, especially in a hostile environment like Windows. We need several tools to support Windows' lack of priorities in this arena. When we encrypt keys some programs have difficulty with the additional overhead of prompting users to decrypt said keys, oh well.
Windows does not have ssh-keygen, install it or a replacement:
Install PuTTY by Simon Tatham. Besides the SSH Terminal PuTTY program there is also a ssh key generator program called PuTTYgen.

Launch PuTTYgen and generate a key
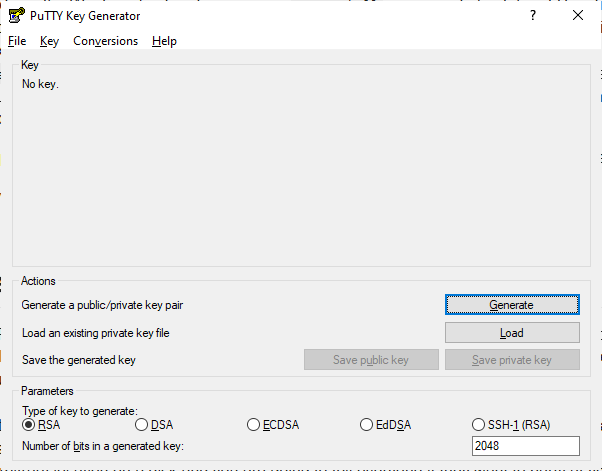
One can generate any number of ssh-keys, I usually do a 4096-bit RSA key, but I think there is a bug in the Raspberry PiOS SecureShell confiuration options that the Raspberry Pi Foundation employees have yet to resolve. The other keys types that I commonly use are ECDSA and Ed25519. If you select the EdDSA radio button you can follow along, but feel free to try one of the other key types I mentioned. You then click genrate and move your mouse around a bit in the Key window to add a little more noise that what would normally be provided by Windows' entropy pool. Once the key generates, add a comment and a passphrase. You may use one of the passwords that you normally give to Microsoft, your bank, and Amazon. You aren't securing anything super important. Just trying to obscure access like you normally would with your financial details. Is that a tongue in my cheek? Heh.
The last thing to do is save the private key somewhere. I just put it on my Desktop. It is encrypted it isn't going to be useful to anybody without my passphrase.
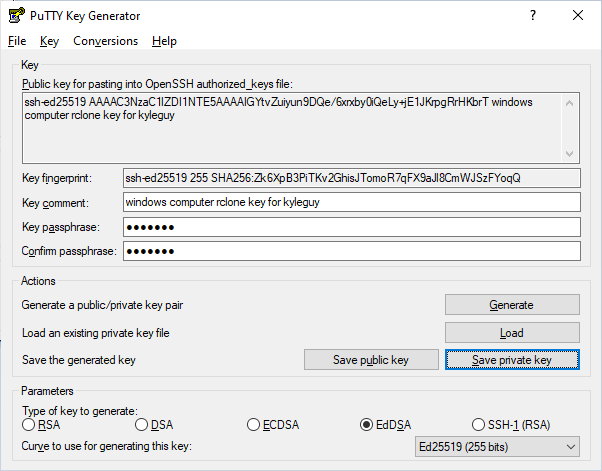
Copy the public key to pebbleguy.com
In the above screenshot you can see the public key. I will copy this key to pebbleguy.com. The private key stays on this local Windows computer on my desktop. You can just copy the public key to your clipboard and add it to your user's authorized keys on pebbleguy.com. When you sign into pebbleguy.com with SecureShell it looks at your authorized keys (a list of public keys) to determine what private keys could be used for authentication. Connect to pebbleguy.com and run the below command. Replace your public key. You can put my public key if you want but I can already sign into my own user using my key so... echo '{{YOUR_PUBLIC_KEY}}' |tee -a ~/.ssh/authorized_keys.
If you used ssh-keygen to generate a key there should be a companion tool, ssh-copy-id that can be used to help install the public key on a remote server.
echo 'ssh-ed25519 AAAAC3NzaC1lZDI1NTE5AAAAIGYtvZuiyun9DQe/6xrxby0iQeLy+jE1JKrpgRrHKbrT windows computer rclone key for kyleguy' |tee -a ~/.ssh/authorized_keys
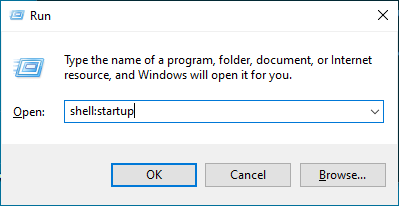
Add a Pageant shortcut to Windows startup
Encrypting private keys to prevent a number of security flaws will expose us to some harsh realities. Windows' keystore, Windows Credential Store is not well known, lacks documentation and is riddled with Microsoftisms. Towards this guide the unsupported nature of the keystore is most impactful. We are going to be using Rclone which doesn't natively support decrypting private keys. They do however support requesting an external program to decrypt a key, but not the Windows Credential Store. Luckly though, the author of PuTTY also wrote a minimal keystore called Pageant. It only supports ssh-keys but with ssh-keys being the defacto key this really doesn't matter. We could also use Gpg4win which was funded by Bundesamt f�r Sicherheit in der Informationstechnik (Germany's Federal Office for Information Security) but since we are focused on ssh-keys we are going to use the smaller footprint solution. I say smaller, in today's world both these solutions are microscopic specs of dust compared to the softwares that are considered "lightweight". The Pageant software is bundled with the PuTTY installer so once you install PuTTY we can setup Pageant to load when Windows loads.
If you are using ssh-keygen you should also have access to ssh-agent which can be configured to aid Rclone with encrypted keys. GNU's GPG-agent would do the same thing but I'm not sure what would happen if Rclone made a request.
Tell Pageant about our key
Using the shortcut we just created, we will provide Pageant a way to find our key.
The Windows properties dialog window has a tab, Shortcut with a taget property that you will set to a value like this:
"C:\Program Files\PuTTY\pageant.exe" --encrypted C:\Users\valued-customer\Desktop\windows-rclone-key-for-kyleguy.ppk
The --encrypted is a flag that tells Pageant that the key is encrypted and to not prompt for the user to enter a passphrase until it is used for the first time. This is an annoyance preventer as by default it will startup with Windows and immediately prompt for the passphrase regardless if you are going to be using the key. When Pageant launches it will put a task manager GUI shortcut in the taskbar. One can view what keys Pageant knows about. Later Rclose will be able to ask Pageant to authenticate ourselves with pebbleguy.com.

Install Rclone
Windows does not have any good generic file synchronization tools. Nick Craig-Wood wrote a synchronization tool focused on commercial cloud storage products and his team ported it to Windows. I've never used it but Rclone seems well liked and well supported. Compiled released binaries can be had using the Windows package manager winget.
winget install Rclone.Rclone
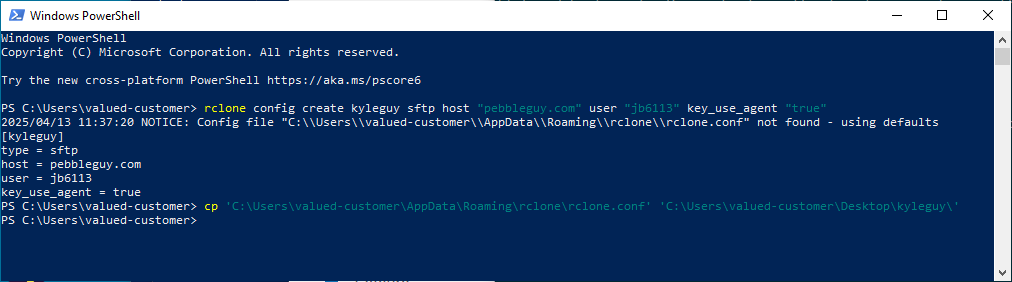
Add an Rclone config for kyleguy
We can tell Rclone about our website and a scheme to update the webserver with changes made to our local static site by providing it configuration directives. Using a Windows terminal, we can issue this Rclone command to generate a config file. Additional configuration documentation is available online. This will make it easier to provide all the details to Rclone every time it is envoked.
By default this will put the config file into your Windows AppData path, C:\Users\valued-customer\AppData\Roaming\rclone\. This is fine, we could also store the config somewhere else like the repository. I'll include both incase one seems better. Just don't get clever and store your private key in the repository. This config has few little security implications, in mine I leak just my pebbleguy.com username, jb6113. As stated earlier we are not leaving unencrypted keys on Windows so we explicitly avoid the directive telling Rclone about our key: key_file "C:\Users\valued-customer\Desktop\windows-rclone-key-for-kyleguy.pem". This won't work anyways as our key if formatted as a .ppk so the Rclone wouldn't be able to read it as-is. Instead we tell Rclone to use an ssh-agent, this is set to true by default but we are going to explicitly set it.
Default path:
rclone config create kyleguy sftp host "pebbleguy.com" user "jb6113" key_use_agent "true"
Copy config to our Hugo static site project repository rclone.conf:
cp 'C:\Users\valued-customer\AppData\Roaming\rclone\rclone.conf' 'C:\Users\valued-customer\Desktop\kyleguy\'
a place called home, or maybe webroot
Base directory. Home. Root. C Drive. What other names are there? Maybe A: or /. The place that is the container for the stuff. Or the directory that holds all the files. Folders if you like that better. The webroot is a name that does not mean anything except for when you care about it. If it were your job to organize a party you'd probably pick a place and tell everyone to meet there. For this tiny amount of time that location is special. It is ground zero for where the party will happen. People who aren't at the specified location aren't at the party. Your party isn't the only party. In fact it might not even be the only party at the location that you picked. The point is that you picked a location made it special because you said it was. This is the same for a webroot. You are just picking some arbitrary location on a disk and you are going to tell everyone if they want to party at your website they need to go there. When you follow the instructions for the site setup you will need to tell NginX about this location. I am going to pick the location and we are going to put some files there to serve up at the party. How long can I draw out this metaphore? Forever.
Our webroot is going to be /mnt/external/websites/kyleguy.rome7.com. We are going to store files in an adjacent directory, further explained when we do the site setup. This directory that actually contains all the .html files and cool pictures of cats is going to be /mnt/external/projects/kyleguy/web/public. And /mnt/external/projects/kyleguy that is this repository. There is a copy of this README.md in /mnt/external/projects/kyleguy/README.md. Whoa trippy. Lets put this README.md there.
cd /mnt/external/projects
git clone https://git.pebbleguy.com/kyle/kyleguy
Public does not exist yet. Let's create it. We are hosting a static site generated by a tool called hugo. We need hugo. One would be better off developing their site on their computer. So let's use Windows because I loath the OS and like maximum pain.
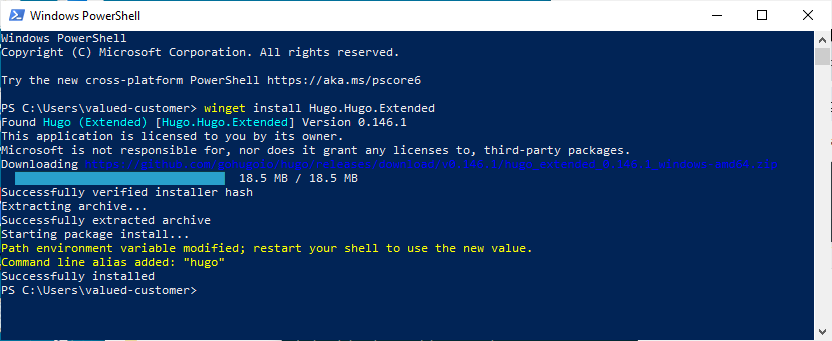
First up is to install Hugo using the windows package manager, winget.
Open a terminal
Download and install hugo
winget install Hugo.Hugo.Extended
uh-oh we want to be in a repository but we do we have one? There are instructions to setup the repository in this guide, go there when you get to a stopping point there come back here.
Wow cool, we have a copy of the kyleguy repository on our windows computer. We can initilize a hugo static site.
Windows is really cool they have a feature where they print red text until you close and reopen the terminal:
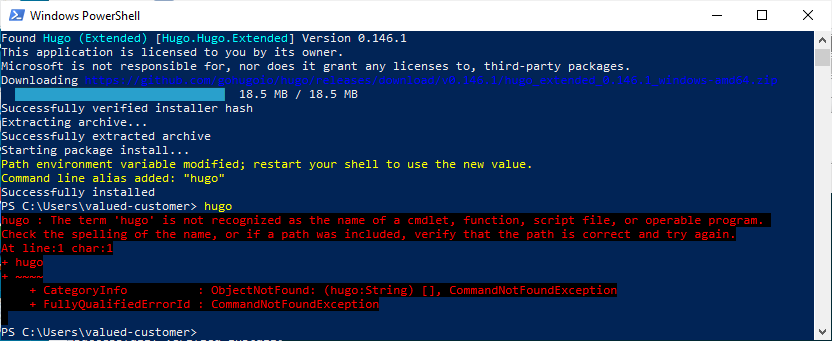
Actually this is a good break, because we cannot use Windows Powershell we need Powershell. Yeh. I cannot fix that. Pretty wild. There is a difference. We will jump back here, but we need to install Powershell first.
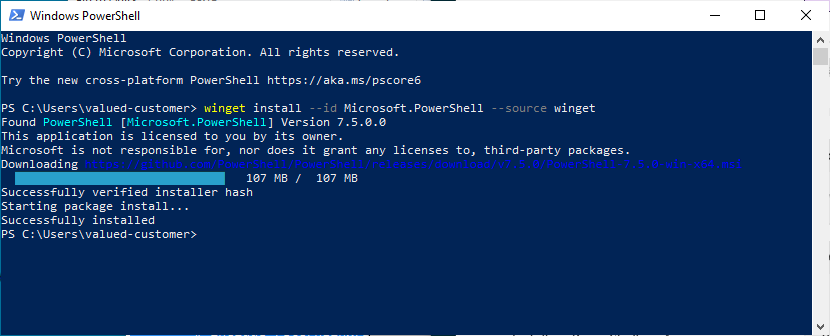
Install Powershell
Open up that terminal, then use winget to install powershell.
back to: uh-oh we want to be in a repository but we do we have one?
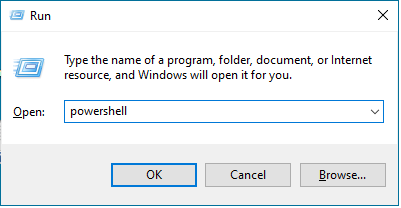
We launch powershell a little differently:
Initilize a static page using hugo Let us initilize the files needed for our website:
cd Desktop/kyleguy
hugo new site web
cd web
git submodule add https://github.com/theNewDynamic/gohugo-theme-ananke.git themes/ananke
echo "theme = 'ananke'" >> hugo.toml
hugo server
If that worked it will look something like this:
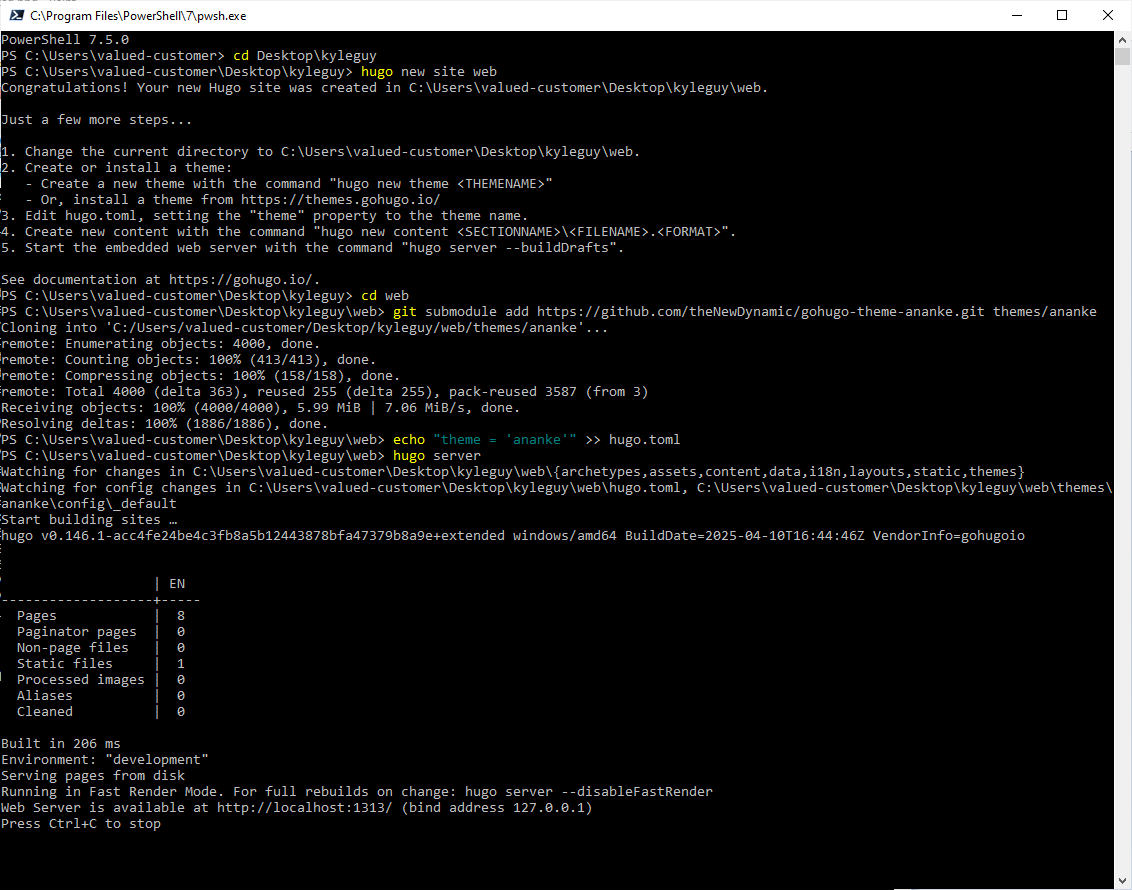
In addition there will be a webserver on our Windows computer. I think hugo will serve the site http://localhost:1313/. This feature is nice and allows us to see our website while we work on it:

some final steps
We should probably add our site to the repository. And that website is pretty basic so one should follow the hugo tutorials to upgrade the page. All the files are in Desktop/kyleguy/web if you've been following closely. Use a terminal for git commands. Maybe edit the .gitignore file to include some folders using our deep knowledge of hugo:
# Hugo
/web/public/
/web/resources/_gen/
/web/assets/jsconfig.json
/web/hugo_stats.json
/web/hugo.exe
/web/hugo.darwin
/web/hugo.linux
/web/.hugo_build.lock
Then add our site and commit:
git add *
git commit -m'added a hugo site'
git push
site setup
You are going to need a domain, either buy one or be a person whom already has a domain. We are going to host our site on pebbleguy.com using the NginX ("engine x") web server. We will create a site configuration file with SSL using a tool, certbot-wapper.sh. This script is part of the pebbleguy repository. Login to your account on pebbleguy.com using Secure Shell (SSH) or ask Kyle, Chris, Daniel, or Emma for help. If you are one of those people, hello! Download the pebbleguy.com repository so you have access to the script and run certbot-wrapper.sh to have it create the NginX config file for your site:
git clone https://git.pebbleguy.com/Dan/pebbleguy.com
cd pebbleguy.com/scripts
./certbot-wrapper.sh -h kyleguy.rome7.com -u kyle
This should create a configuration file either on the external disk or primary disk depending on if pebbleguy.com is in Read-Only or Read-Write mode. More info on that here. The locations are either /mnt/external/live-server-configs/for-nginx/sites-enabled/kyleguy-web.conf or /etc/nginx/sites-enabled/kyleguy-web.conf.
Keep those file locations in mind for later.
When I ran certbot-wrapper the system was in Read-Write mode so my config was created /etc/nginx/sites-enabled/kyleguy-web.conf:
server {
        server_name kyleguy.rome7.com;
        # listen 80;
        listen 443 ssl;
        index index.php;
        root /mnt/external/websites/kyleguy.rome7.com/;

        location / {
            # first attempt to serve request as file, then as directory, then fall back to displaying a 404.
            try_files $uri $uri/ =404;
        }

        # reverse proxy for initial certbot http challenge (we have certbot listen on 888)
        # include /etc/nginx/includes/certbot-web-plugin.conf;

        # include php by default
        include /etc/nginx/includes/php-location-directives.conf;

        ssl_certificate /mnt/external/live-server-configs/letsencrypt/live/kyleguy.rome7.com/fullchain.pem;
        ssl_certificate_key /mnt/external/live-server-configs/letsencrypt/live/kyleguy.rome7.com/privkey.pem;
        # include /etc/nginx/snippets/ssl-params.conf;
}
Now we need to create a directory to store our site. You'll notice in the generated config file it has some defaults choosen for us, root /mnt/external/websites/kyleguy.rome7.com/;. It hasn't actually done any of the work it is meant only to bootstrap a config file and retrieve SSL certificates for https. If you use your SSH connected terminal to navigate to the external drive you will see a projects directory:
cd /mnt/external
ls
will show:
username@pebbleguy:/mnt/external $ cd /mnt/external
username@pebbleguy:/mnt/external $ ls
gogs  live-server-configs  lost+found  projects  websites
You will put your site repository into the projects directory. You will also notice a websites directory. You could put your website there, but you'd get caught in an organizational nightmare. Instead we will put a sort of shortcut into the websites directory that points to the actual website directory that is contained in our repository. This way we don't ever need to come back to this terminal on pebbleguy.com to mess around with our files ever again, probably.
username@pebbleguy:/mnt/external $ cd /mnt/external
username@pebbleguy:/mnt/external $ ls
gogs  live-server-configs  lost+found  projects  websites
username@pebbleguy:/mnt/external $ sudo ln -s /mnt/external/projects/kyleguy/web/public/ /mnt/external/websites/kyleguy.rome7.com
username@pebbleguy:/mnt/external $ ls /mnt/external/websites
emma-kac  gogs-webhooks  KingsAndChaos  kyleguy.rome7.com  shootGame  www.pebbleguy.com
repository setup
Configure the your domain registrar's DNS
This assumes you are using the DNS provided by your domain registrar. Some common registrars are Cloudflare, SquareSpace, Wix, GoDaddy, Gandi, Namecheap, and others. FYI, I listed some bad and some good ones, not a review just blasting.
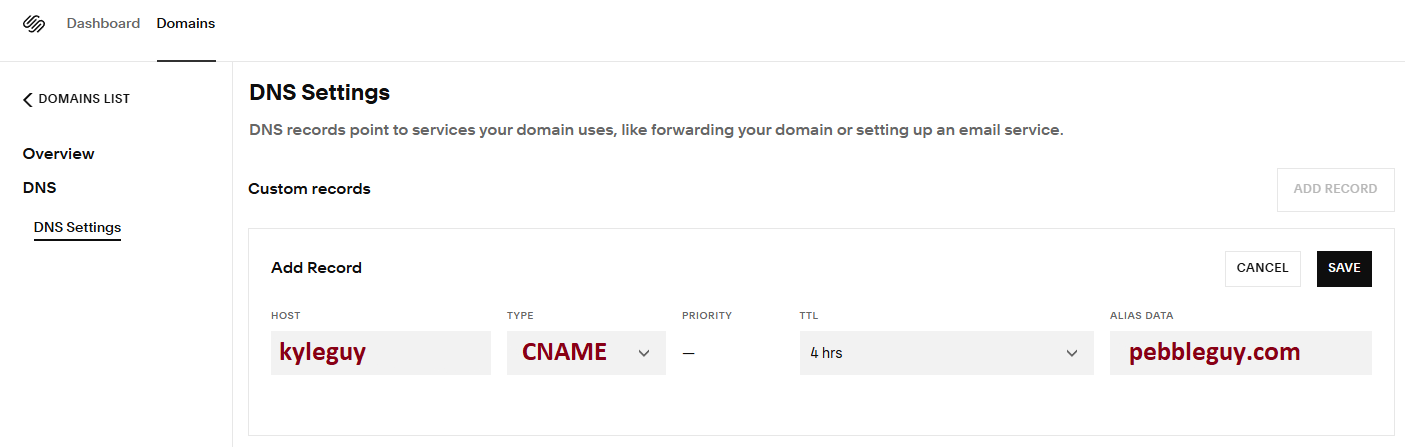
Not necessarily the first thing that needs to be accomplished, but if it is done early time can be saved while the DNS provider tries to spread the word out to the internet about your domain. Add a record for the domain name. In this example we add kyleguy.rome7.com, you only add a record for the subdomain part, kyleguy. You are the decision maker for what domain points to this site. My site will be hosted on pebbleguy.com so I use a CNAME so that when people go to my site they will know where my site is located. I did not want a site at rome7.com so I am creating a subdomain:
Create a git repository
Login to your account on git.pebbleguy.com. Click the add repository button:

Then fill out the form. We will use some predefined options to template our gitignore file and have Gogs initialize the repository for us.

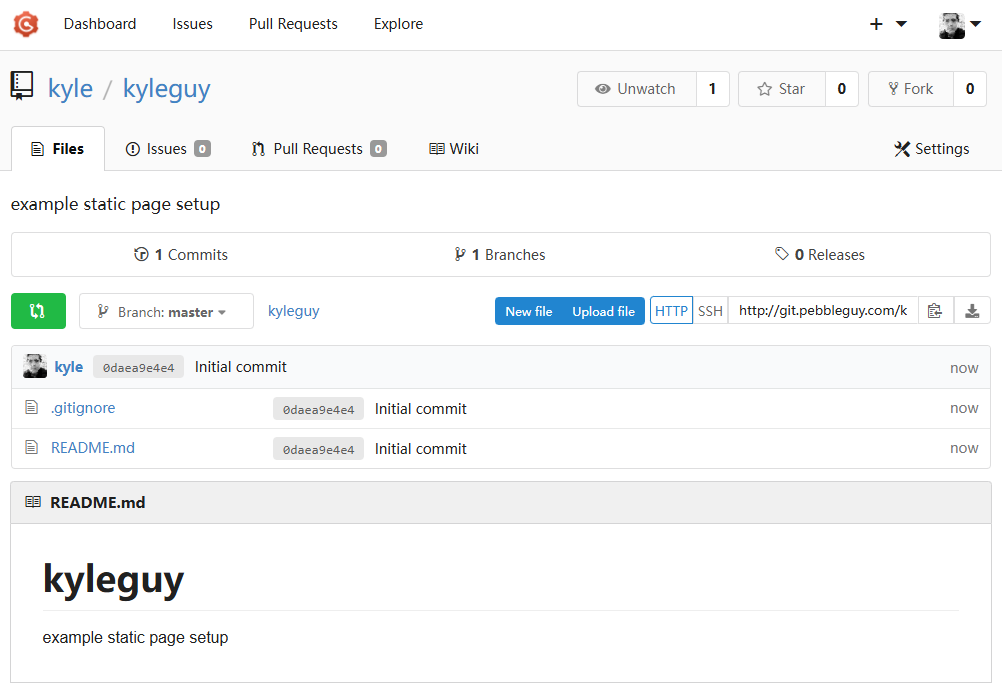
This is what the mostly empty repository looks like if you were successful:
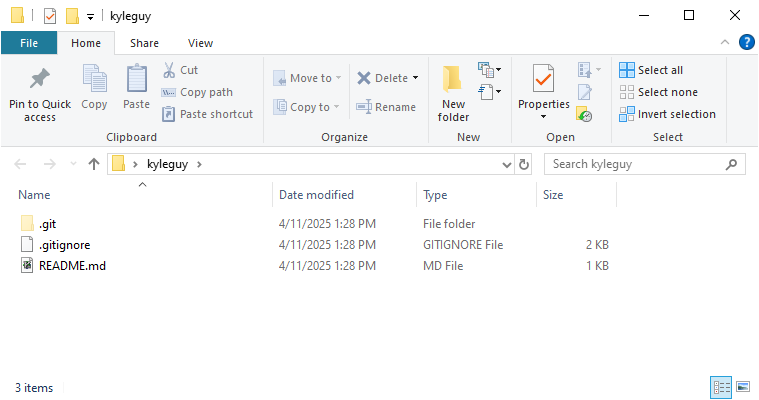
Get a copy of the repository on your computer
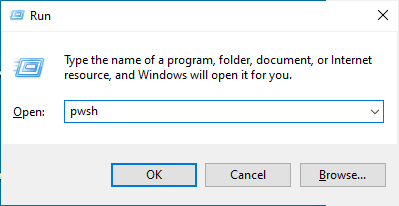
Open powershell or cmd:
You will clone the repository to your desktop, type these commands into the powershell terminal. The output should match closely with the example. You will want to replace the clone url with your own repository https://git.pebbleguy.com/{{your_gogs_account_name}}/{{repository_name}}
cd desktop
git clone https://git.pebbleguy.com/kyle/kyleguy

With the repository cloned to your desktop successfully, you should be able to use the Windows file explorer to view the files: